I have been stock piling my freezer in preparation for baby's arrival and the chaotic times that are sure to come. Estevan thought I was nuts when I told him that I wanted to make meals for the sole purpose of freezing them. He was also worried about the food budget getting jacked, a worry that I can't blame him for. Preparing for a baby is very expensive! So, instead of buying a bunch of food to freeze on top of food for our normal consumption, I decided to split every big meal in half. Since it's just the two of us, we always have leftovers and those leftovers sometimes do not get eaten. At least one portion of every meal ends up getting thrown away! I have been able to stock up a lot of food by simply baking one half right away and storing the other half in the freezer. Behold the yummy goodness...
We have chicken spaghetti, stuffed shells, stuffed chicken breasts, marinade for lemon rosemary chicken, and a small meat loaf. I wrote the name of each dish, cooking instructions, and the date it was frozen on each package.
Here is a breakdown of the recipes that I chose, click the titles to see full recipe:
Most of the foods have been prepared up to the point of baking. I will set my oven to a lower temp and bake the chicken spaghetti and shells for about 20 minutes to warm up and then raise it to the normal temp and bake for the normal time. The stuffed chicken breasts will need to be thawed then wrapped in the puff pastry and baked as normal. The marinade will simply need to be thawed and the chicken pieces plopped right into the bag. I cooked the meat loaf almost entirely to ensure it will not be overcooked and dry when reheated, it will be thawed and then baked until the internal temp is 170.
Pin It Now!
Not only have I been busy nesting at home, I have been very busy preparing my classroom for a long term sub. No easy feat and especially cumbersome when you are as OCD as me!
I started prepping my filing cabinets by organizing all of my papers, trashing obsolete ones, and making copies. My kindergarten team is seriously ready for the first 9 weeks with all of our copies! I made 25 copies of each paper since I don't know my class size. You can see the large labels in the picture above, I like these because it makes things so much easier to find than the normal sized file labels. Plus my brain is kind of funny in that it remembers colors associated with certain titles, might be a little freaky but sure makes it easy to find that orange-colored Pete the Cat file. I also attached sticky notes to certain worksheets if I tend to do something differently than the directions or if I know a book that goes particularly well with it. I'm going to be honest, there are a bunch of sticky notes in my files! I have a problem with relinquishing control... there I said it!
I placed my learning centers in my filing cabinets as well. This is new for me, normally they are just in a plastic crate in the order that I use them. However, I want my sub to know exactly when the appropriate time is to use each learning center which is why I placed them within my chronologically ordered filing cabinet. I made hot pink label papers for all of my centers, you can see them evenly spaced in my cabinet picture above. I glued the title page to the outside of the file and placed all of the papers and materials inside like so...
Each paper has been copied and clipped to a baggie with the contents for that activity inside. By the way, I adore Julie Lee's centers!
I then went through and labeled my bins where I place the students' extra school supplies. I never labeled them before because this was my kingdom and I already knew where to look for supplies, no sweat. But imagine how frustrating it would be to have to look high and low for an extra glue stick because the sub placed them somewhere else. Hmmm, maybe that's just my own personal nightmare. =P
I went completely nuts with documenting where things go, even the students' things like writing tablets and math workbooks. If you have a system figured out that works for you I think it would be nice to come back to that same system already established in your classroom.
The documentation continued with my schedule. I know that schedules look nothing alike from year to year but this will give my sub something to go off of. This is probably one of the most time consuming parts of beginning a year and I want to make it as easy as I can for my sub.
Finally, I went around my entire classroom taking pictures of where furniture is located. Each August I come back to tables piled up in a corner, cabinets turned around against a wall, and chairs stacked to the ceiling. It is a crazy few days rearranging my classroom each year! I might spend hours tweaking the location of a freaking bookshelf because it affects the location of my computers 20 feet away. So this year, I got up close and personal with the location of everything in my room so that things can just be rolled, carted, and pushed back to where they should be. No more guessing and moving 10 times.
So that's how I have prepared my classroom for a long term sub starting at the beginning of the year. I've come to terms with this small amount of control over a situation where I seem to have none whatsoever.
I have been very busy with only 43 days left to the arrival of our little girl and summer vacation finally here. Nesting is kicking in full blast! Never in a million years would I have thought, however, that nesting would take the form that it has lately.
I found an amazing idea for a hot air balloon mobile on Etsy but baulked at the idea of spending $70 for something that could obviously be handmade. I did some research through Pinterest and found a DIY blog with the perfect template: www.howjoyfull.com. Joy did a wonderful job making her template and describing the overall process but I had to do a lot of research through YouTube videos to find exactly how to make this, that's why I'm posting it all here. I'm not going to lie to you and tell you that it was easy, or all that cheap, but it sure was fulfilling to make on my own!
These are the supplies that I bought at JoAnn's for a little under $50. I had to buy everything since I've never sewn before but I'm sure your total would be a lot less if you have any of these already on hand. Please disregard the smaller embroidery hoop, I didn't end up using it for this craft.
I downloaded the template from the HowJoyfull website, click on this template PDF to download directly.
I decided to use the size 2 and 3 outlines only. I figured out what color combinations I wanted to use and cut them out by placing the templates over the felt, using the rotary cutting set to cut.
Chevron patterns play a big part in the nursery so I decided to tackle the most complicated balloon first. I figured out how far away I wanted my cuts to be and used the angle lines on my cutting board to trace them out on my template.
Next, I placed the template paper over a felt piece and poked a hole through the point in the chevron pattern with a pen to make a small dot.
I used this dot as a place to mark where to stop cutting. Those lines on the cutting board were a life saver! The cutting was a tedious part but do not skip corners and cut more than one piece at a time, that will only result in wonky cuts that are uneven.
Once the cutting was complete, I lined them all up in order. Lookin' good already!
After researching how to sew two pieces of felt together, I decided to use a blanket stitch. I used this video to teach myself, I love that there's no annoying lady describing every detail. Watch and learn!
I did my blanket stitch on a flat surface to that the balloon will take shape properly. By the way, this is the side that will show on the balloon, I made sure no marks were visible.
Continue the same blanket stitch through all of the pieces, connecting them all together. The connecting stitches get tricky but just remember that if they are not that tight you can always fix it when you stitch them together vertically.
Tie off the top stitches and then start the same process all over again with the bottom pieces of the balloon. It's getting easier!
I forgot to take a picture of the next step but switch out your embroidery thread and needle for a general use needle and thread. I used plain white thread and a blanket stitch to connect the pieces vertically from top to bottom from the inside. Be sure to carefully attached the pieces at the tops, you will end up with a bunch of knots but it's important that they are secured.
Go ahead, take a look at what a cute balloon this will be. It's worth all of this effort!
I slipped a long piece of embroidery thread with a knot at the end through a small piece of felt and led the thread through the top of my balloon. This will be used to hang the balloons. You could also use fishing line if you'd rather the invisible floating look.
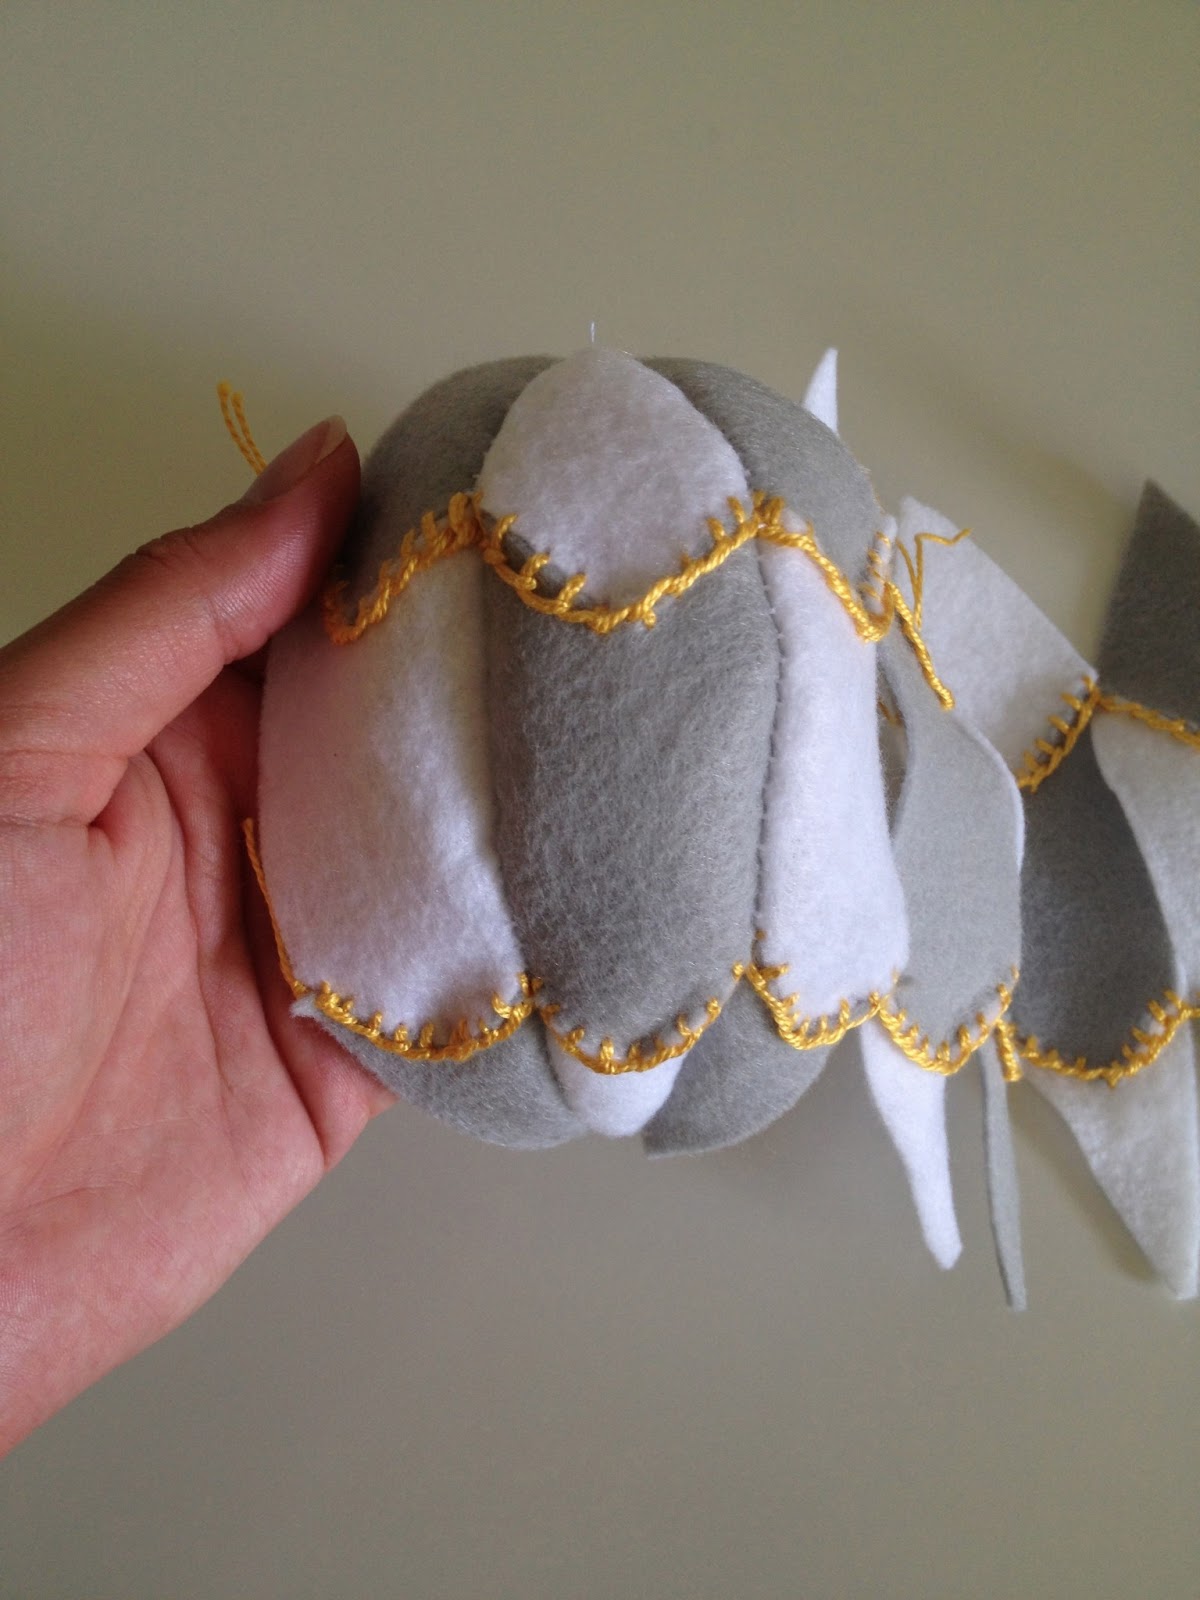
Then, I stitched up the last piece to about half way and flipped the balloon right side out. I used fluff from an old pillow to gently stuff the balloon to my liking and then stitched it closed.
I held the small circle, which I cut using the appropriate template, and used a blanket stitch to attach it to the bottom of my balloon.
To attach the 'basket', I tied a knot in a piece of embroidery floss and lead it through the bottom of the balloon, starting at the middle and coming out one side at 12 o'clock. LEAVE A TAIL ON THE THREAD! I didn't and it ended up being more difficult to tie at the end.
Cut one of the craft corks in half, this is the perfect size. I then pushed the needle through the cork and pulled it through with pliers.
I led the thread through at 6 o'clock on the bottom of the balloon and out again at 9 o'clock. I repeated the process through the cork again at a perpendicular angle. I finished back through the balloon at 3 o'clock, back out through the center and then tied the pieces together.
Voila, a finished balloon!
By the time I made a few balloons, I started getting really good at the flat blanket stitch. It's hard to describe but I started pulling this part tight by hand instead of straight from the needle....
.... then this thread. This prevented the thread from pulling the felt out of whack and resulted in a more even stitch.
I used a hot glue gun to attach this fun little pom pom ribbon.
I made clouds by freehand cutting and using gray embroidery floss to blanket stitch on the outside. It's still hanging from my ceiling fan as we are not set on the location of the crib but it is something I am really proud of. I will be sure to post pictures of the finished nursery soon!
I used the small embroidery hoop and leftover pieces of felt to make this little name plate. A running stitch attached the pennant and I used a backstitch to embroider our little girl's name. Love!
We are in the final stretch of school and have been draggin' butt with grades, tests, and long writing assignments. I decided that we need a little pick-me-up to get us through the final days of school.
Check out what the kids saw on Tuesday morning as they walked into our class...
Their eyes nearly popped out and nobody could close their mouth. It was hilarious to watch everyone round the corner and stop halfway in the door.
I have 22 balloons hanging from the ceiling for each child in my class. Each balloon has a small strip of paper with a quick but very fun activity for the kids to do that day. We count down the days by popping one balloon a day and doing the activity inside. The balloon is popped by the child whose name is written on the crepe paper streamer taped to the balloon. Some of the activities I have are "Play hot potato" or "Shaving cream creations". They all take less than 15 minutes but the kids get super excited each day to see what they get to do. It's a blast!
This week was also Teacher Appreciation week. My kids and parents were amazing! I feel so spoiled and very much appreciated. I don't think I could have dreamed up a better group of kids to have during this time in my life. They are so special and loving which is a good thing because this momma is starting to really look forward to relaxing by the pool all summer!
I received our little girl's baby book in the mail yesterday and I couldn't be happier with it. I searched high and low for the perfect book and finally turned to Etsy. Then, I found the store of Edna Mae and fell in love with her designs. She handmakes her covers and designs her pages on heavy card stock of the best quality. What I like about her books is that they are customizable and easy to arrange however I want because of the three-hole design. She has even more options on her webpage, www.ModernBabyBooks.com.
I decided on the gray cover and Whimsy Pink pages.
The colors are perfect for a little girl!
I love this page for marking down the milestones.
So many pages for writing down memories. What you can't see are the pale blue gridlines on each page, handy for staying straight and steady!
I placed this in the book already. I can hardly wait to fly back up to Michigan!
I am going to share a little more about how extremely spoiled I was by my room moms this year. These blankets were part of the diaper cake that I received. I was shocked and amazed to see that these are not just any blankets, they are hand stitched and embroidered blankets! I could hardly believe it when I started undoing that beautiful present; both Estevan and I were blown away by the love and dedication it took to make these.
I'm very slowly getting back into gardening in our new house. It's a big job and it often overwhelms me to think about where to start. There are so many places where I can plant flowers that it's just too much to handle. I seriously need to narrow my focus. I snagged some $2 plants from Lowe's at the end of last season after we had finished up the hardscape around the pool. So far, only 6 plants but it was a start.
This agapanthus is just beginning to flower. I'm not really sure what all the plants will end up looking like because this is the only one with many small flowers; the others are sprouting tall buds. I love how this plant resembles the allium plants that I adored in Lansing.
I am amazed that we built this hardscape ourselves. We had all the stone already in the yard, we just moved it to this new location to help build up the backside of the pool decking. It was a tough job but it was so worth the effort. The company that we hired to lay sod asked us who we hired to do that job, they told us that their company would have charged us $3,000 to do all that. Jackpot!
We have big plans for this area behind the water feature. It's just weed infested mulch right now but soon we will have small palms and bird of paradise flowers. Very tropical! Again, we had those stones lying around. It took us about an hour of silent work time to figure out an arrangement and lay them all together. Estevan and I work very well as a team, it's funny that we often don't even have to talk when we have one goal in mind.
We just need to figure out what to plant here. We arranged the stones and laid down mulch but so far, no plans. It's fairly shaded back here and so far we only have some pink crepe myrtles and one ligustrum. I'm thinking that we need a thicker layer of mulch to cut down on the amount of weeds popping through. But at least we only spent $500 on mulch for both the front and back yards, labor included. I'm sure that as the years go by it will continue to get thicker and more weed proof.
That's it for now! Hopefully, there will be more to come soon.
Pin It Now!
I'm having a baby! My husband and I are expecting a little baby girl in August, we are thrilled! We've been very busy lately getting the house ready and painting the nursery. I promise to post pics of the nursery once it's finished; there's only one coat of paint so far and a simple day bed. For now, here is a picture of the cute little girl, herself.
Have I told you yet how sweet my class is this year? Well, they are the kindest and most loving kids I have ever met. What makes it even better is that their parents are equally as sweet. Three of my room moms surprised me today with a gorgeous diaper cake.
I started tearing up when they walked in, I was so surprised! What is even sweeter is that it was made by the mom who is moving away. Her daughter is the most precious little girl, I will miss her dearly. This mom spent weeks making this gift while also preparing to move across the country. How thoughtful is that?! I later heard from our secretary that this wonderful woman made the blankets herself because she "couldn't find the right color combinations in the store." She literally hand stitched some and sewed all the rest. Incredible! Check out the details that she added...
I didn't even remember telling her the colors of our nursery, she was so slick. She nailed the color scheme that we have chosen. Dead on.
I have recently started making my own units to sell on www.TeachersPayTeachers.com. If you are a teacher and have never heard of this website you need to go to it right now! Teachers Pay Teachers is the best thing to happen to my teaching career; it is full of beautiful units made by teachers and sold to teachers. What I love the most is that sellers are just normal teachers and are easily reached if anything needs to be tweaked in their units. No more white out and crooked copies!
Go check it out and, while you're there, please go to my store too. Look at what I have so far, become a 'follower' of my store and you'll also receive notifications when I post new items for sale or freebies.
I am officially in school mode and busy nearly every day with making things for my kindergarten classroom. As much as I love to blog during the summer, I love to make my classroom the best it can be during the school year. It's crazy how much my focus shifts as soon as school starts! This poor blog just seems to fall by the wayside.
Here are a few of the amazing things that I have done with my classroom this year. Seriously, I couldn't be happier with the results of all my effort.
I redid all of my walls and added new places for work to be displayed. I still LOVE my eInstruction clicker storage next to my word wall, it's a shoe organizer cut in half for the little darlings to grab their own clicker.
We all got new whiteboards over the summer. Yay for magnetic space! You can also see the coloring books that I give to every student, they are amazing for the few minutes that students need to do something at their seats while others are finishing up work. Those coloring books will last all year, boom!
This is my calendar area and reading/word study center area. More details about that iHelp chart and birthday bags further down.
This is what you see as you enter my classroom, math center work table from Ikea, and my favorite piece of furniture which is my rolling file organizer from The Container Store.
Can you spot our "Tattle Telephone" on the light colored cabinet by my desk? It cracks me up! One day a boy was about to tell me a tattle and I told him, "Is it important for me to hear right now, or can you leave me a message?" He then scratched his chin, picked up the phone and mumbled to himself, "How should I put this..." and proceeded with his tattle. I just about fell off my chair I was laughing so hard. Of course it's just an old phone that I screwed onto the cabinet but it works like a charm!
I stapled these white paper bags to the wall and filled them with tissue paper. I then wrote the students' birthdays on the cupcakes and put a birthday pencil in the bag for them. Easy way to see the birthdays coming up and ensure that I have their gift ready.
I LOVE this job chart! The "apps" are made from library card pockets (free from the librarian) with clip art pictures of the jobs. I then print off small pictures of each student and glue those onto popsicle sticks. I place the popsicle sticks in the pockets and, viola, everyone knows their job.
This is the cutest way to keep track of table rewards and I am constantly getting compliments on it. Every time I catch the students all working together, or all following the directions, they get a monkey. They get to choose a prize from the prize box when they get 10 monkeys dangling above their table.
This is yet another change that I made this year and it is working so much better! I switched out stapling student work all year to clipping it on the clothesline. The clothes line is the only part that is stapled into the boards, genius!
This is my favorite center. I typed the sight words into Google Docs and saved them as JPEG, dragged the JPEG files onto a USB drive and hooked it into my digital picture frame. The sight words appear for about 10 seconds and the students write them down.
Our classroom gnome, Gnorman (hehehehe), is still an active member of our room. He left this note and a bag with Mr. Potato Head inside. Mr. Potato head taught us about listening ears, watching eyes, quiet mouth, puzzle hands, and thinking cap.
Welcome to my blog. This is the spot where I store creative ideas, recipes, books, gardening schemes, and other sundry things that pass through my home. I hope that you like what you find and use some of my ideas to make your own cute little house!