This summer has been a wonderful summer. I have never experienced a summer quite like this one before in that I'm not bored and lonely at all. I've kept myself busy with birthday projects, painting rooms in our house, taking trips with friends, enjoying family visiting from Michigan, and playing with my lovely Rae. This summer has been absolutely perfect.
Here are a few shots of our summertime fun.
Having some fun at a local splash pad.
Rae's favorite animal at Old McDonald's Farm.
Kerbey Lane cafe was our favorite breakfast place in Austin. Cinnamon roll pancakes were out of this world!
About to go into Longhorn Caverns, excited!
The entrance to Longhorn Caverns. Rae didn't make it much further than this, haha!
I painted over the hideous 'Venetian plaster' job in Rae's bathroom.
Rae helped.
I tore down the crazy tea-stained paper treatment that was in the game room upstairs and got very brave with this new color, 'Expressive Plum'.
Finally, I made these fun decorations for Rae's party. The lemonade stand was so easy to make it shocked me. Can't wait for August 9th!
We are just about finished with putting together and decorating the nursery for our little girl. I am 38 weeks and 5 days, she could come at any moment! I can't wait to see her and bring her home to this cute little room.
Before we found out if we were having a boy or girl, we decided to paint the nursery gray and yellow. We love how the colors are bright and cheery while still being gender neutral, this was important because we wanted baby items to be neutral enough to be passed from one child to the next. Check out some pics!
I love walking in and seeing the morning sunlight pouring through the plantation shutters. I finally hung up the hot air balloon mobile that I made for our sweet baby girl.
We placed a bed in her room for me to sleep in for the first few weeks when she is waking up in the middle of the night for on demand feedings. Here's to hoping that she can sleep in her crib from day one! Bonus is that the bed will be her big girl bed some day.
My dad has made some stacking toys in the shape of a rainbow, cloud, and sun which I will place on the top floating shelf. He's driving from AZ next week to be with us, so happy!
We fell in love with this small painting in New Orleans. Perfect way to bring a little girly charm to her room.
You knew her dresser drawers wouldn't be arranged all willy-nilly, don't act surprised. Top drawer contains changing table essentials (more to be added as we figure out what she needs), pacifiers, hair accessories, bibs, hats, mittens, and socks. Basically, all the little odds and ends of her wardrobe.
Second and third drawers contain onesies and rompers arranged by size.
Good golly, all of these diapers came from diaper cakes that were given as gifts at the baby showers. Took me over an hour to remove rubber bands and unroll each one but we are set for a good amount of time! By the way, this is one of the drawers in the daybed; yay for storage!
I love the closet space in our home, this is a huge closet! Inside, we have dresses hanging up with blankets, burp clothes, and sleep sacks placed on the closet organizer. Her larger stuffed animals are sitting inside the oak chest. I'm head over heals in love with my Petunia Pickle Bottom diaper bag!
I found these baskets at The Container Store for about $5 each, they fit perfectly on these small built-in shelves. They contain toys for her carseat and toys for when she gets a little older.
These baskets also came from The Container Store, we have soft toys in one and hard/teething toys in the other. These are stored right above her changing station for instant distraction if she starts fussing while being changed.
I can't wait to sit in this glider with her and read some of our favorite stories. The ledges are actually picture ledges from Ikea! I like how the books easily conceal the cord to the video monitor attached to the wall above her crib because I'm picky like that.
Details
Wall colors: Valspar Cheerful Hue and Natural Gray
Crib: Pottery Barn Kids, Hayden
Dresser and daybed: Ikea
Swivel glider and ottoman: Best Chair Inc., Dolphin color, bought at Baby's and Kid's 1st
I have been very busy with only 43 days left to the arrival of our little girl and summer vacation finally here. Nesting is kicking in full blast! Never in a million years would I have thought, however, that nesting would take the form that it has lately.
I found an amazing idea for a hot air balloon mobile on Etsy but baulked at the idea of spending $70 for something that could obviously be handmade. I did some research through Pinterest and found a DIY blog with the perfect template: www.howjoyfull.com. Joy did a wonderful job making her template and describing the overall process but I had to do a lot of research through YouTube videos to find exactly how to make this, that's why I'm posting it all here. I'm not going to lie to you and tell you that it was easy, or all that cheap, but it sure was fulfilling to make on my own!
These are the supplies that I bought at JoAnn's for a little under $50. I had to buy everything since I've never sewn before but I'm sure your total would be a lot less if you have any of these already on hand. Please disregard the smaller embroidery hoop, I didn't end up using it for this craft.
I downloaded the template from the HowJoyfull website, click on this template PDF to download directly.
I decided to use the size 2 and 3 outlines only. I figured out what color combinations I wanted to use and cut them out by placing the templates over the felt, using the rotary cutting set to cut.
Chevron patterns play a big part in the nursery so I decided to tackle the most complicated balloon first. I figured out how far away I wanted my cuts to be and used the angle lines on my cutting board to trace them out on my template.
Next, I placed the template paper over a felt piece and poked a hole through the point in the chevron pattern with a pen to make a small dot.
I used this dot as a place to mark where to stop cutting. Those lines on the cutting board were a life saver! The cutting was a tedious part but do not skip corners and cut more than one piece at a time, that will only result in wonky cuts that are uneven.
Once the cutting was complete, I lined them all up in order. Lookin' good already!
After researching how to sew two pieces of felt together, I decided to use a blanket stitch. I used this video to teach myself, I love that there's no annoying lady describing every detail. Watch and learn!
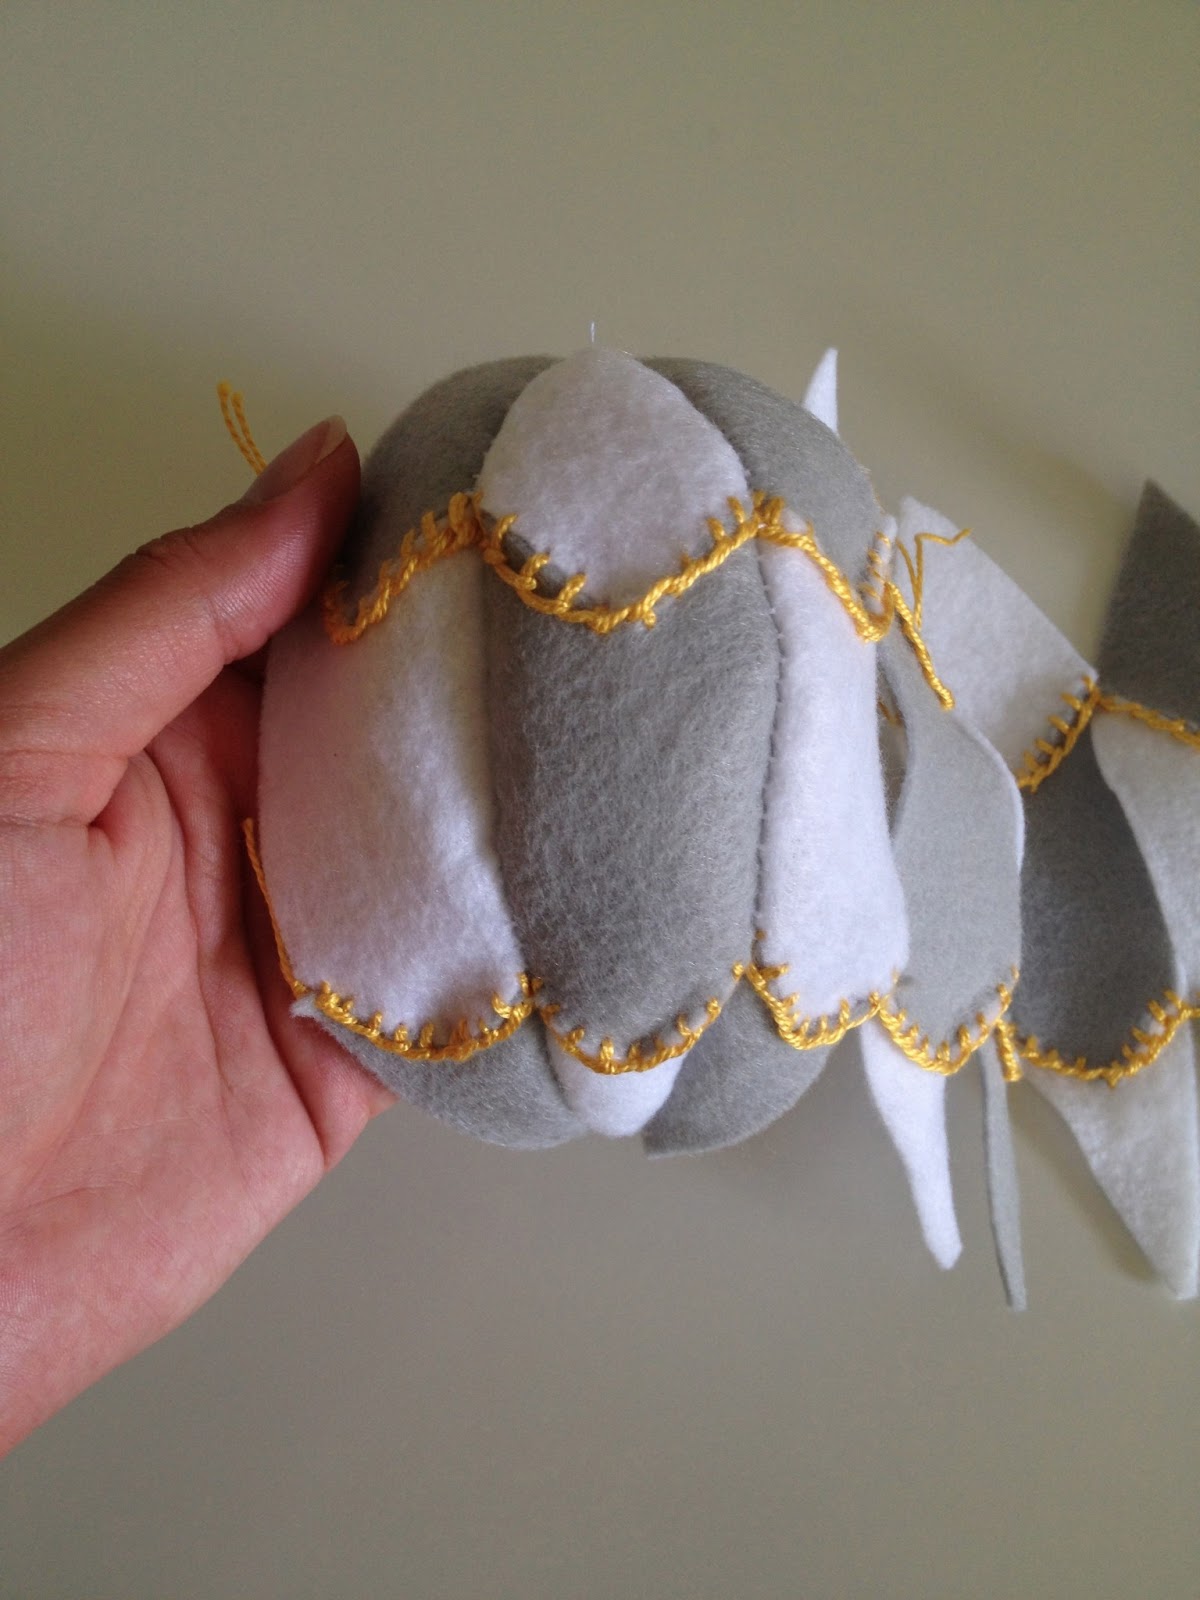
I did my blanket stitch on a flat surface to that the balloon will take shape properly. By the way, this is the side that will show on the balloon, I made sure no marks were visible.
Continue the same blanket stitch through all of the pieces, connecting them all together. The connecting stitches get tricky but just remember that if they are not that tight you can always fix it when you stitch them together vertically.
Tie off the top stitches and then start the same process all over again with the bottom pieces of the balloon. It's getting easier!
I forgot to take a picture of the next step but switch out your embroidery thread and needle for a general use needle and thread. I used plain white thread and a blanket stitch to connect the pieces vertically from top to bottom from the inside. Be sure to carefully attached the pieces at the tops, you will end up with a bunch of knots but it's important that they are secured.
Go ahead, take a look at what a cute balloon this will be. It's worth all of this effort!
I slipped a long piece of embroidery thread with a knot at the end through a small piece of felt and led the thread through the top of my balloon. This will be used to hang the balloons. You could also use fishing line if you'd rather the invisible floating look.
Then, I stitched up the last piece to about half way and flipped the balloon right side out. I used fluff from an old pillow to gently stuff the balloon to my liking and then stitched it closed.
I held the small circle, which I cut using the appropriate template, and used a blanket stitch to attach it to the bottom of my balloon.
To attach the 'basket', I tied a knot in a piece of embroidery floss and lead it through the bottom of the balloon, starting at the middle and coming out one side at 12 o'clock. LEAVE A TAIL ON THE THREAD! I didn't and it ended up being more difficult to tie at the end.
Cut one of the craft corks in half, this is the perfect size. I then pushed the needle through the cork and pulled it through with pliers.
I led the thread through at 6 o'clock on the bottom of the balloon and out again at 9 o'clock. I repeated the process through the cork again at a perpendicular angle. I finished back through the balloon at 3 o'clock, back out through the center and then tied the pieces together.
Voila, a finished balloon!
By the time I made a few balloons, I started getting really good at the flat blanket stitch. It's hard to describe but I started pulling this part tight by hand instead of straight from the needle....
.... then this thread. This prevented the thread from pulling the felt out of whack and resulted in a more even stitch.
I used a hot glue gun to attach this fun little pom pom ribbon.
I made clouds by freehand cutting and using gray embroidery floss to blanket stitch on the outside. It's still hanging from my ceiling fan as we are not set on the location of the crib but it is something I am really proud of. I will be sure to post pictures of the finished nursery soon!
I used the small embroidery hoop and leftover pieces of felt to make this little name plate. A running stitch attached the pennant and I used a backstitch to embroider our little girl's name. Love!
Wreaths are my favorite part of holidays. Easter wreaths, fourth of July wreaths, Halloween wreaths, Thanksgiving wreaths, and Christmas wreaths. This is the season for Halloween wreaths and I have found an abundance of inexpensive ideas floating around in blogland. Click on the photos to follow the links.
Candy corn, how adorable!
Easy rag wreath. I may just need to go out and buy some fabric.
Not quite a wreath, per say, but it's still adorable!
Holy moley! What a whirlwind couple of weeks! We've finally got everything in order at our new place and the rooms are starting to take on that old familiar, homey look. This is the first flat that Estevan and I have ever lived in and I have to admit, we are are really liking it. And yes, I'm taking on the European model of calling our apartment a flat. Sounds so much cooler and sophisticated, right? =) We chose a complex that is very freshly built, we are actually the first ones to live in our unit, and it's on a lake! The transition from house to apartment has been surprisingly easy. Even Java is adjusting amazingly well! Java has made many new friends here, one of which is named Belle. I'll have to take my camera out more often because it's the funniest thing when Java and Belle meet... they stand on their back legs and hug each other! So funny.
Ok, so on to the main show.... here's some pics of the new place. Enjoy!
Granite counter tops throughout the flat. LOVE THEM!
We were so shocked that this table set fit. Super cute.
Our place faces East. Awesome morning light and it remains bright throughout the day.
This in one of two built in bookcases. I think I'm done fiddling with the arrangement. Maybe.
Today was my first day of spring break and what a wonderful day it was! It's about 75 degrees and sunny. While enjoying the day at one of our outdoor malls, I found an amazing home store called Z Gallery. I could have spent all day browsing around, looking at all the beautiful things. Click on the photos below to shop along with me.
P.S. I don't know what's going with my font either and I'm now waving the white flag of defeat.... Blogspot you've outsmarted me again!
Caprise Pilla Holders $9.99 (Holy steal of a deal Batman!)
Cyperus Stems, 6 for $23.70 (Z Gallery has some amazing faux flowers)
Sassolino Pillar Holder $39.95
Twig Coat Rack $139 (I'm going to stalk this one for a sale)
Chloe Vases $29.95-49.95
Ceramic Parrot $39.95 (ridiculous and awesome and at the same time)
Welcome to my blog. This is the spot where I store creative ideas, recipes, books, gardening schemes, and other sundry things that pass through my home. I hope that you like what you find and use some of my ideas to make your own cute little house!