Rae had a beautiful first birthday on Saturday. I couldn't have imagined a more perfect day, it was warm and sunny with family and friends. I designed and hand made these invitations on my Cameo Silhouette using inspiration from a few different invitations that I found on Etsy. I love the little poem and simplicity of the invitations!
I then set to work on the props for the day including this lemonade stand. I almost didn't make it but then found all the pieces that I needed at Michael's and couldn't resist how easy it all was.
I glued the pieces together with wood glue and painted it yellow using the leftover wall paint from her nursery. I then cut out the lettering and decorations using my Cameo, that machine was so easy to use and crucial for all of my decorations.
I put the lemonade stand at the curb with a few balloons to let people know where the party was. Rae was so adorable in her little lemon shirt from Janie and Jack!
I hung a few pieces of twine and placed all of my favorite photos from the past year. Rae loved looking at all of her pictures.
One of Estevan's coworkers used to be a professional pastry chef and this was her gift to Rae. It was absolutely perfect and was the centerpiece for the day.
Rae didn't get too messy but she did enjoy her taste of cake!
The cake was vanilla with a raspberry filling, so decadent.
She liked the rind more than the actual watermelon; good thing she had her bathing suit on!
This summer has been a wonderful summer. I have never experienced a summer quite like this one before in that I'm not bored and lonely at all. I've kept myself busy with birthday projects, painting rooms in our house, taking trips with friends, enjoying family visiting from Michigan, and playing with my lovely Rae. This summer has been absolutely perfect.
Here are a few shots of our summertime fun.
Having some fun at a local splash pad.
Rae's favorite animal at Old McDonald's Farm.
Kerbey Lane cafe was our favorite breakfast place in Austin. Cinnamon roll pancakes were out of this world!
About to go into Longhorn Caverns, excited!
The entrance to Longhorn Caverns. Rae didn't make it much further than this, haha!
I painted over the hideous 'Venetian plaster' job in Rae's bathroom.
Rae helped.
I tore down the crazy tea-stained paper treatment that was in the game room upstairs and got very brave with this new color, 'Expressive Plum'.
Finally, I made these fun decorations for Rae's party. The lemonade stand was so easy to make it shocked me. Can't wait for August 9th!
I have been very busy with only 43 days left to the arrival of our little girl and summer vacation finally here. Nesting is kicking in full blast! Never in a million years would I have thought, however, that nesting would take the form that it has lately.
I found an amazing idea for a hot air balloon mobile on Etsy but baulked at the idea of spending $70 for something that could obviously be handmade. I did some research through Pinterest and found a DIY blog with the perfect template: www.howjoyfull.com. Joy did a wonderful job making her template and describing the overall process but I had to do a lot of research through YouTube videos to find exactly how to make this, that's why I'm posting it all here. I'm not going to lie to you and tell you that it was easy, or all that cheap, but it sure was fulfilling to make on my own!
These are the supplies that I bought at JoAnn's for a little under $50. I had to buy everything since I've never sewn before but I'm sure your total would be a lot less if you have any of these already on hand. Please disregard the smaller embroidery hoop, I didn't end up using it for this craft.
I downloaded the template from the HowJoyfull website, click on this template PDF to download directly.
I decided to use the size 2 and 3 outlines only. I figured out what color combinations I wanted to use and cut them out by placing the templates over the felt, using the rotary cutting set to cut.
Chevron patterns play a big part in the nursery so I decided to tackle the most complicated balloon first. I figured out how far away I wanted my cuts to be and used the angle lines on my cutting board to trace them out on my template.
Next, I placed the template paper over a felt piece and poked a hole through the point in the chevron pattern with a pen to make a small dot.
I used this dot as a place to mark where to stop cutting. Those lines on the cutting board were a life saver! The cutting was a tedious part but do not skip corners and cut more than one piece at a time, that will only result in wonky cuts that are uneven.
Once the cutting was complete, I lined them all up in order. Lookin' good already!
After researching how to sew two pieces of felt together, I decided to use a blanket stitch. I used this video to teach myself, I love that there's no annoying lady describing every detail. Watch and learn!
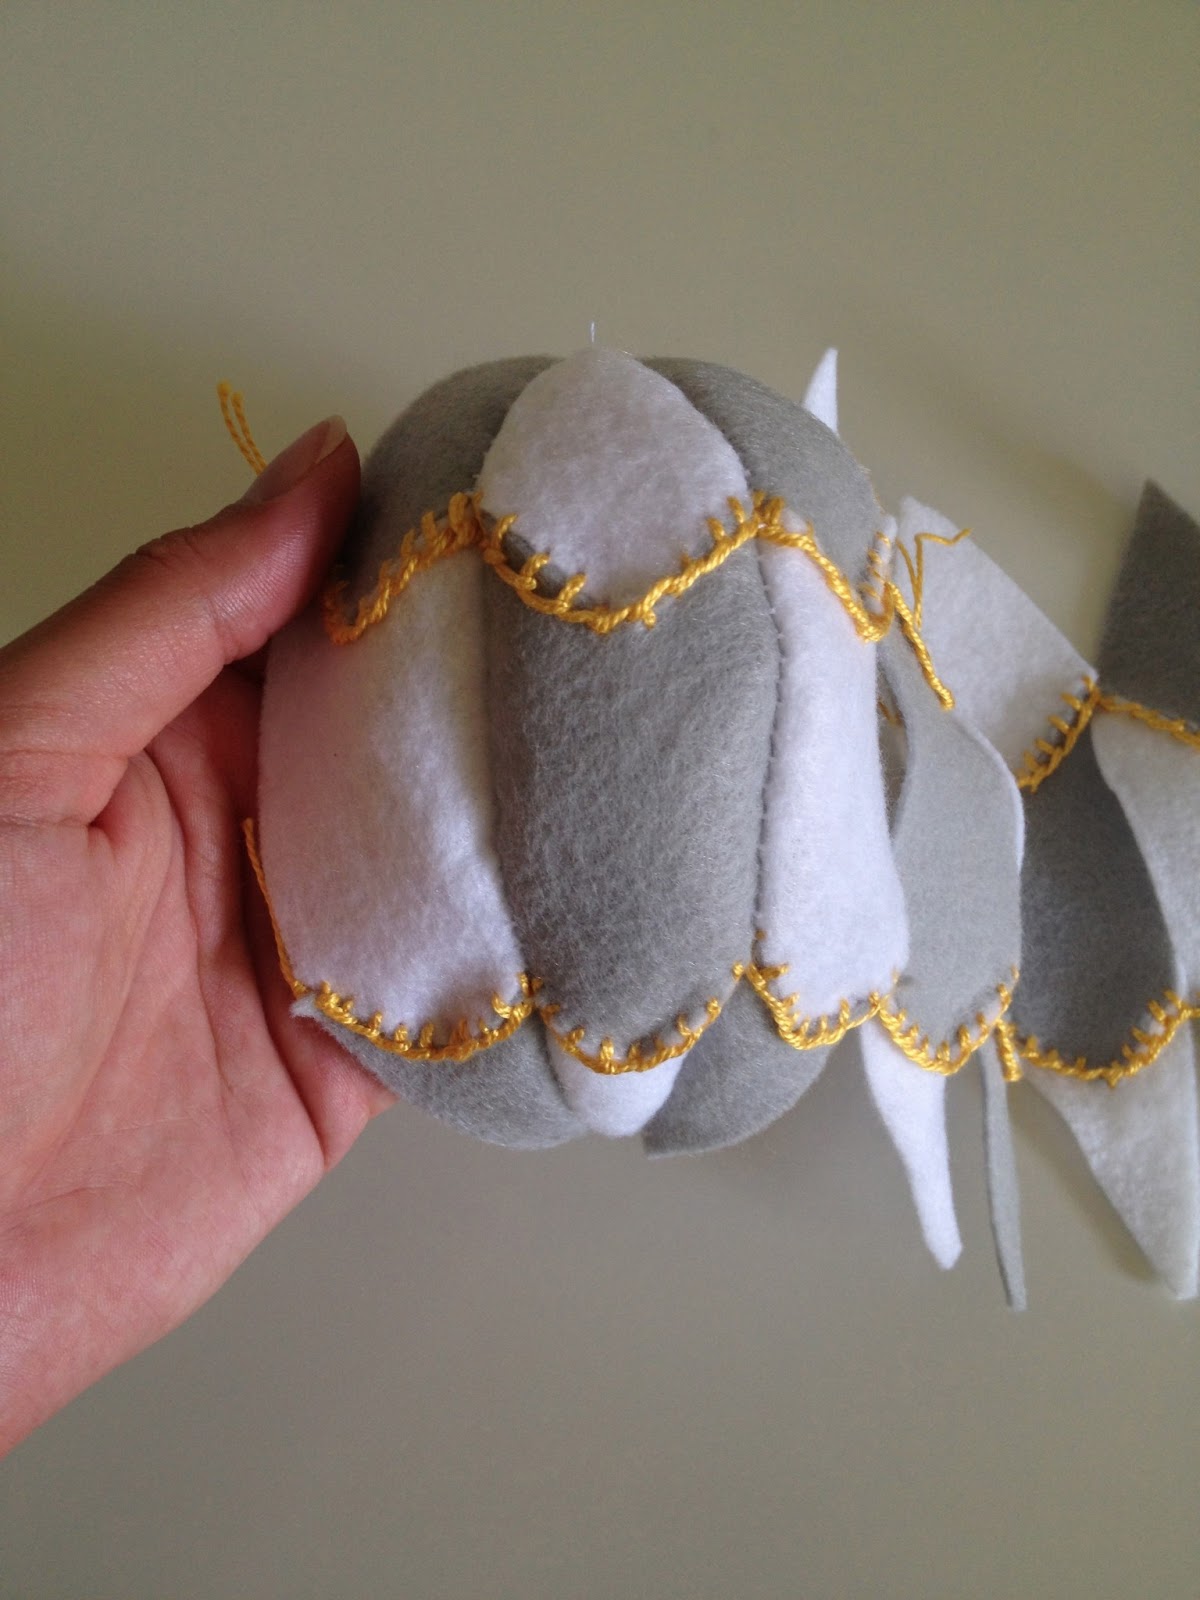
I did my blanket stitch on a flat surface to that the balloon will take shape properly. By the way, this is the side that will show on the balloon, I made sure no marks were visible.
Continue the same blanket stitch through all of the pieces, connecting them all together. The connecting stitches get tricky but just remember that if they are not that tight you can always fix it when you stitch them together vertically.
Tie off the top stitches and then start the same process all over again with the bottom pieces of the balloon. It's getting easier!
I forgot to take a picture of the next step but switch out your embroidery thread and needle for a general use needle and thread. I used plain white thread and a blanket stitch to connect the pieces vertically from top to bottom from the inside. Be sure to carefully attached the pieces at the tops, you will end up with a bunch of knots but it's important that they are secured.
Go ahead, take a look at what a cute balloon this will be. It's worth all of this effort!
I slipped a long piece of embroidery thread with a knot at the end through a small piece of felt and led the thread through the top of my balloon. This will be used to hang the balloons. You could also use fishing line if you'd rather the invisible floating look.
Then, I stitched up the last piece to about half way and flipped the balloon right side out. I used fluff from an old pillow to gently stuff the balloon to my liking and then stitched it closed.
I held the small circle, which I cut using the appropriate template, and used a blanket stitch to attach it to the bottom of my balloon.
To attach the 'basket', I tied a knot in a piece of embroidery floss and lead it through the bottom of the balloon, starting at the middle and coming out one side at 12 o'clock. LEAVE A TAIL ON THE THREAD! I didn't and it ended up being more difficult to tie at the end.
Cut one of the craft corks in half, this is the perfect size. I then pushed the needle through the cork and pulled it through with pliers.
I led the thread through at 6 o'clock on the bottom of the balloon and out again at 9 o'clock. I repeated the process through the cork again at a perpendicular angle. I finished back through the balloon at 3 o'clock, back out through the center and then tied the pieces together.
Voila, a finished balloon!
By the time I made a few balloons, I started getting really good at the flat blanket stitch. It's hard to describe but I started pulling this part tight by hand instead of straight from the needle....
.... then this thread. This prevented the thread from pulling the felt out of whack and resulted in a more even stitch.
I used a hot glue gun to attach this fun little pom pom ribbon.
I made clouds by freehand cutting and using gray embroidery floss to blanket stitch on the outside. It's still hanging from my ceiling fan as we are not set on the location of the crib but it is something I am really proud of. I will be sure to post pictures of the finished nursery soon!
I used the small embroidery hoop and leftover pieces of felt to make this little name plate. A running stitch attached the pennant and I used a backstitch to embroider our little girl's name. Love!
I'm having a baby! My husband and I are expecting a little baby girl in August, we are thrilled! We've been very busy lately getting the house ready and painting the nursery. I promise to post pics of the nursery once it's finished; there's only one coat of paint so far and a simple day bed. For now, here is a picture of the cute little girl, herself.
Have I told you yet how sweet my class is this year? Well, they are the kindest and most loving kids I have ever met. What makes it even better is that their parents are equally as sweet. Three of my room moms surprised me today with a gorgeous diaper cake.
I started tearing up when they walked in, I was so surprised! What is even sweeter is that it was made by the mom who is moving away. Her daughter is the most precious little girl, I will miss her dearly. This mom spent weeks making this gift while also preparing to move across the country. How thoughtful is that?! I later heard from our secretary that this wonderful woman made the blankets herself because she "couldn't find the right color combinations in the store." She literally hand stitched some and sewed all the rest. Incredible! Check out the details that she added...
I didn't even remember telling her the colors of our nursery, she was so slick. She nailed the color scheme that we have chosen. Dead on.
I am officially in school mode and busy nearly every day with making things for my kindergarten classroom. As much as I love to blog during the summer, I love to make my classroom the best it can be during the school year. It's crazy how much my focus shifts as soon as school starts! This poor blog just seems to fall by the wayside.
Here are a few of the amazing things that I have done with my classroom this year. Seriously, I couldn't be happier with the results of all my effort.
I redid all of my walls and added new places for work to be displayed. I still LOVE my eInstruction clicker storage next to my word wall, it's a shoe organizer cut in half for the little darlings to grab their own clicker.
We all got new whiteboards over the summer. Yay for magnetic space! You can also see the coloring books that I give to every student, they are amazing for the few minutes that students need to do something at their seats while others are finishing up work. Those coloring books will last all year, boom!
This is my calendar area and reading/word study center area. More details about that iHelp chart and birthday bags further down.
This is what you see as you enter my classroom, math center work table from Ikea, and my favorite piece of furniture which is my rolling file organizer from The Container Store.
Can you spot our "Tattle Telephone" on the light colored cabinet by my desk? It cracks me up! One day a boy was about to tell me a tattle and I told him, "Is it important for me to hear right now, or can you leave me a message?" He then scratched his chin, picked up the phone and mumbled to himself, "How should I put this..." and proceeded with his tattle. I just about fell off my chair I was laughing so hard. Of course it's just an old phone that I screwed onto the cabinet but it works like a charm!
I stapled these white paper bags to the wall and filled them with tissue paper. I then wrote the students' birthdays on the cupcakes and put a birthday pencil in the bag for them. Easy way to see the birthdays coming up and ensure that I have their gift ready.
I LOVE this job chart! The "apps" are made from library card pockets (free from the librarian) with clip art pictures of the jobs. I then print off small pictures of each student and glue those onto popsicle sticks. I place the popsicle sticks in the pockets and, viola, everyone knows their job.
This is the cutest way to keep track of table rewards and I am constantly getting compliments on it. Every time I catch the students all working together, or all following the directions, they get a monkey. They get to choose a prize from the prize box when they get 10 monkeys dangling above their table.
This is yet another change that I made this year and it is working so much better! I switched out stapling student work all year to clipping it on the clothesline. The clothes line is the only part that is stapled into the boards, genius!
This is my favorite center. I typed the sight words into Google Docs and saved them as JPEG, dragged the JPEG files onto a USB drive and hooked it into my digital picture frame. The sight words appear for about 10 seconds and the students write them down.
Our classroom gnome, Gnorman (hehehehe), is still an active member of our room. He left this note and a bag with Mr. Potato Head inside. Mr. Potato head taught us about listening ears, watching eyes, quiet mouth, puzzle hands, and thinking cap.
Welcome to my blog. This is the spot where I store creative ideas, recipes, books, gardening schemes, and other sundry things that pass through my home. I hope that you like what you find and use some of my ideas to make your own cute little house!