She is growing remarkably well, weighing in at 11 pounds, 14.5 ounces. She's right on track with all of her measurements which makes this momma very happy and extremely relieved. I'm always very nervous in the days leading up to her doctor appointments, scared that something is wrong and I'm not catching it. I'm hoping there will be a time when I don't worry so much about her but I don't know if that day will ever come.
Rae took perfectly to the bottle from the instant it touched her lips. There was no more crying that night... from either of us. She finished off 2 ounces within 3 minutes, eating as if she hadn't eaten in days. In fact, this may very well have been the case. She clearly was not getting the milk she needed, not after losing nearly a pound in two weeks.
The relief I felt was like nothing I had ever felt before. I thought I had felt relief before in my life but nothing compares to going through the devastating heartache I felt and then finally knowing that my baby was getting what she needed. That knowing was the absolute best feeling for a new mom who doubted herself through every step. That knowing was the one shred of control that I felt in my life at the time.
I very quickly came to grips with the fact that Rae was going to be bottle fed. I was perfectly content with my new decision. It was, actually, quite shocking how OK I was about it. However, the little voice in my head, that voice that constantly second guesses everything, was wondering why I was so OK with this switch. Was I being selfish because her latch hurt and her nails dug into my skin as I held her writhing body to mine? Was I selfish in wanting to pump because the responsibility of feeding her wouldn't fall solely on my shoulders anymore? Had I given up too easily?
I quickly dispelled those thoughts in favor of knowing that I was doing what was best for my daughter. She was still getting the very best, breast milk, even though it was not coming in the traditional way.
I talked to a few family members about our new routine, expressing how extremely relieved I was that Rae was eating so well. I was happy to share the good news that she was gaining weight. The response I received about pumping completely opposed that feeling of relief I felt. They were sad for me, they sent me links to websites for help on latching, told me to go back to the hospital to see a specialist, told me to watch videos on positioning.
They told me to not give up on breastfeeding.
That's what hurt the worse. Had I given up? There it was again, that voice in my head. It was coming back and in the worse possible way. Was I giving up on the most important experience for my daughter?
I thought about this for days with the guilt returning to my heart. All these people were telling me that what I felt as relief was wrong and that I was somehow giving up. Of course, nobody ever said those words. Their words were meant to be encouraging but they were anything but.
Undaunted, I continued to pump and bottle-feed Rae. She continued to gain weight but better yet, she was finally content. She stopped needing a pacifier every second of every day, she fell asleep with a peaceful smile instead of a furrowed brow. I was headstrong in the conviction that, by any means necessary, Rae was going to get what she needed to be happy.
You see, that's the thing about me...I am very stubborn. I'm headstrong to a fault sometimes but that's what I needed. I finally dispelled the nagging voice in my head and brushed off the words that were tearing me to pieces inside. I certainly had not given up! If I had given up, my child would be fed formula. Screw those people telling me to not give up. And while I'm at it, screw that voice in my head telling me I'm being selfish.
Becoming an exclusive pumper is extremely hard. It takes hours of dedication and it's certainly not the easy way out. It is a selfless act.
I have been pumping for 6 weeks and am very proud of my dedication. Some days I wish it would all be over, that maybe formula isn't all that bad. But then I look at my smiling girl and remember that as long as I can produce the best, I'm going to give her the best.
This is a post that I have been putting off for weeks. I keep thinking that I should put this experience into words but never know exactly how I feel about it. I never know if I feel like a failure or a success, it's hard when so many people keep telling me what to do but I feel totally opposite. The experience I am talking about is breastfeeding.
Breastfeeding is one of the most amazing things in this world for a new mother. You, alone, can give your child everything she needs. Your body is no longer just yours, it's sustaining life for this incredible little human that you just brought into this world. But what happens when that little person isn't getting all that she needs? What if your best and your doctor's best advice isn't working and isn't enough? That is what happened to me.
Rae was born 7 pounds 14 ounces and she seemed to have a great latch. All the nurses were amazed at how quickly she latched and how powerfully she seemed to suckle. She loved to nurse and would continue sucking on her hands when she wasn't at my breast. One of the nurses gave her a pacifier to sooth her so she wouldn't get in the habit of sucking on her hands.
She was perfect in the hospital and was still going strong once we got home. I felt so powerful and overwhelmingly happy that my baby was flourishing with my care. That all started to change after about a week at home. It started with her ferociously latching and then quickly detaching herself. We would continue like this for a few minutes at the beginning of every feeding until she would finally latch on for good. She was acting like she was starving but then becoming very annoyed at the lack of milk. I couldn't understand because I could see the milk and could even drip some into her mouth. It was there! We continued like this for a week, she was not sleeping well and needing to feed almost constantly. I was not deterred, I thought this was normal. Thinking this surely happens to everyone as they begin to breastfeed.
I was so happy to get out of the house with my perfect little baby girl on the morning of her two week checkup. The doctors were going to ooh and aah over how cute she was and how well she was doing. She was perfect after all.
We waited in the special room for infants and the nurse called her name for us to come back. She placed her on the scale and told me she weighed 7 pounds. I knew she was going to be less than birth weight, that's perfectly normal to loose a little. But almost a pound? Was that normal??
The nurse seemed concerned about her weight loss; she should have only lost a few ounces, not 14. That's when it all started to change for me. I immediately thought to all the times she cried hysterically at my breast, not latching for an hour and then sucking for a few minutes until drifting off into exhausted sleep. I thought about how I couldn't sooth her against my chest, Estevan had to be the one to take her and calm her down before trying to latch yet again.
I couldn't look away from my baby girl, the nurse was asking me questions but I couldn't think straight. Tears were coming and I desperately wanted to be anywhere but that office. As soon as the doctor entered the office, I was in full blown ugly crying mode. She was so nice to me, she even made me laugh a little saying that doctors fully expect new mothers to be leaking out of every hole. She was very reassuring to me but still told me that if my daughter lost another ounce, she would have to be readmitted to the hospital.
My entire mind switched into survival mode, not for me but for my baby girl. We went into a special room with a rocking chair and my doctor helped me position myself for nursing. She gave me lots of tips and advice for ensuring a good latch. Rae was exhausted but latched for a little while, giving the doctor and I hope that her tips were working. I continued trying for the rest of that day, nursing whenever Rae was awake and even waking her up after a short time to nurse again.
I was physically and emotionally running on fumes. I don't even know if there were fumes to run on. I couldn't stop crying for the rest of that day. Literally, couldn't stop. I was failing my daughter, either I couldn't produce enough or I couldn't help her to latch properly.
That evening, Estevan sat with us as I tried feeding her for three hours. He would take her when she cried so hard her face turned purple and she stopped breathing. She was so distraught it was breaking my heart. Finally, he suggested that we get out the breast pump. We had bought it weeks before she was born as a backup plan. In fact, we had registered for all sorts of bottles and all the accessories to go with them. Bottles, whether with breast milk or formula, were always our plan B. I knew this was always an option but hadn't wanted to accept it for some reason.
I immediately started crying harder when he suggested the pump. I was terrified that my baby was going to starve that evening, that somehow I wasn't producing enough and the tiny amount I did produce was going to get stuck in the pump. Now we can look back and laugh but I was cowering in tears and hysterically crying that my milk would get stuck somewhere in the tubes of the machine and that she would get even less than just trying to latch her again and again. I was at my lowest point and absolutely terrified that I was making every possible mistake.
I held onto my sleeping girl as he went downstairs to figure it out. My dad read the manual as Estevan cleaned the bottles and pump parts. Within ten minutes he was back upstairs with a working knowledge of how to pump. I have never been more thankful to have him as my husband in my entire life. He was my coach throughout all the struggles, looking up videos to help and reaching right in to make sure Rae was in the best position, soothing her when she was starving and frustrated, giving me the reassurance that I was doing a good job. Now he was showing how the pump worked and helping me to properly place the flanges. I was still scared that there wasn't going to be any milk but his help was the gentle reassurance that I needed to get started.
I started the pump.
We sat there, staring at the bottles as the milk slowly dripped down, saying silent prayers that it would all work out. It was 11 o'clock at night and my breasts hadn't been properly emptied for days. I'm sorry if that is too much information but I think you get what I'm saying. I definitely had enough milk for Rae, it did not get stuck somewhere in the tubes of the machine!
She's getting so big, already growing out of her newborn clothes! I'm excited for all of her milestones but it's hard to describe the feeling I get when I look at her tiny sleeper with the scalloped frills that she will never fit into again. I know there are beautiful dresses and adorable shoes waiting in her closet but I just want to hang onto that sleeper forever.
In the end, she's growing at a fantastic pace and I couldn't be happier that I'm giving her everything she needs. Here's to experiencing all the firsts that month two has to offer!
Our little girl has arrived! She was born on August 9th at 3:35 pm.
She has truly completed our life, can't imagine it without her now. Estevan put it very well, it's like she has a part of our souls in her. She's a dream come true.
Pin It Now!
We are just about finished with putting together and decorating the nursery for our little girl. I am 38 weeks and 5 days, she could come at any moment! I can't wait to see her and bring her home to this cute little room.
Before we found out if we were having a boy or girl, we decided to paint the nursery gray and yellow. We love how the colors are bright and cheery while still being gender neutral, this was important because we wanted baby items to be neutral enough to be passed from one child to the next. Check out some pics!
I love walking in and seeing the morning sunlight pouring through the plantation shutters. I finally hung up the hot air balloon mobile that I made for our sweet baby girl.
We placed a bed in her room for me to sleep in for the first few weeks when she is waking up in the middle of the night for on demand feedings. Here's to hoping that she can sleep in her crib from day one! Bonus is that the bed will be her big girl bed some day.
My dad has made some stacking toys in the shape of a rainbow, cloud, and sun which I will place on the top floating shelf. He's driving from AZ next week to be with us, so happy!
We fell in love with this small painting in New Orleans. Perfect way to bring a little girly charm to her room.
You knew her dresser drawers wouldn't be arranged all willy-nilly, don't act surprised. Top drawer contains changing table essentials (more to be added as we figure out what she needs), pacifiers, hair accessories, bibs, hats, mittens, and socks. Basically, all the little odds and ends of her wardrobe.
Second and third drawers contain onesies and rompers arranged by size.
Good golly, all of these diapers came from diaper cakes that were given as gifts at the baby showers. Took me over an hour to remove rubber bands and unroll each one but we are set for a good amount of time! By the way, this is one of the drawers in the daybed; yay for storage!
I love the closet space in our home, this is a huge closet! Inside, we have dresses hanging up with blankets, burp clothes, and sleep sacks placed on the closet organizer. Her larger stuffed animals are sitting inside the oak chest. I'm head over heals in love with my Petunia Pickle Bottom diaper bag!
I found these baskets at The Container Store for about $5 each, they fit perfectly on these small built-in shelves. They contain toys for her carseat and toys for when she gets a little older.
These baskets also came from The Container Store, we have soft toys in one and hard/teething toys in the other. These are stored right above her changing station for instant distraction if she starts fussing while being changed.
I can't wait to sit in this glider with her and read some of our favorite stories. The ledges are actually picture ledges from Ikea! I like how the books easily conceal the cord to the video monitor attached to the wall above her crib because I'm picky like that.
Details
Wall colors: Valspar Cheerful Hue and Natural Gray
Crib: Pottery Barn Kids, Hayden
Dresser and daybed: Ikea
Swivel glider and ottoman: Best Chair Inc., Dolphin color, bought at Baby's and Kid's 1st
I have been stock piling my freezer in preparation for baby's arrival and the chaotic times that are sure to come. Estevan thought I was nuts when I told him that I wanted to make meals for the sole purpose of freezing them. He was also worried about the food budget getting jacked, a worry that I can't blame him for. Preparing for a baby is very expensive! So, instead of buying a bunch of food to freeze on top of food for our normal consumption, I decided to split every big meal in half. Since it's just the two of us, we always have leftovers and those leftovers sometimes do not get eaten. At least one portion of every meal ends up getting thrown away! I have been able to stock up a lot of food by simply baking one half right away and storing the other half in the freezer. Behold the yummy goodness...
We have chicken spaghetti, stuffed shells, stuffed chicken breasts, marinade for lemon rosemary chicken, and a small meat loaf. I wrote the name of each dish, cooking instructions, and the date it was frozen on each package.
Here is a breakdown of the recipes that I chose, click the titles to see full recipe:
Most of the foods have been prepared up to the point of baking. I will set my oven to a lower temp and bake the chicken spaghetti and shells for about 20 minutes to warm up and then raise it to the normal temp and bake for the normal time. The stuffed chicken breasts will need to be thawed then wrapped in the puff pastry and baked as normal. The marinade will simply need to be thawed and the chicken pieces plopped right into the bag. I cooked the meat loaf almost entirely to ensure it will not be overcooked and dry when reheated, it will be thawed and then baked until the internal temp is 170.
Pin It Now!
Not only have I been busy nesting at home, I have been very busy preparing my classroom for a long term sub. No easy feat and especially cumbersome when you are as OCD as me!
I started prepping my filing cabinets by organizing all of my papers, trashing obsolete ones, and making copies. My kindergarten team is seriously ready for the first 9 weeks with all of our copies! I made 25 copies of each paper since I don't know my class size. You can see the large labels in the picture above, I like these because it makes things so much easier to find than the normal sized file labels. Plus my brain is kind of funny in that it remembers colors associated with certain titles, might be a little freaky but sure makes it easy to find that orange-colored Pete the Cat file. I also attached sticky notes to certain worksheets if I tend to do something differently than the directions or if I know a book that goes particularly well with it. I'm going to be honest, there are a bunch of sticky notes in my files! I have a problem with relinquishing control... there I said it!
I placed my learning centers in my filing cabinets as well. This is new for me, normally they are just in a plastic crate in the order that I use them. However, I want my sub to know exactly when the appropriate time is to use each learning center which is why I placed them within my chronologically ordered filing cabinet. I made hot pink label papers for all of my centers, you can see them evenly spaced in my cabinet picture above. I glued the title page to the outside of the file and placed all of the papers and materials inside like so...
Each paper has been copied and clipped to a baggie with the contents for that activity inside. By the way, I adore Julie Lee's centers!
I then went through and labeled my bins where I place the students' extra school supplies. I never labeled them before because this was my kingdom and I already knew where to look for supplies, no sweat. But imagine how frustrating it would be to have to look high and low for an extra glue stick because the sub placed them somewhere else. Hmmm, maybe that's just my own personal nightmare. =P
I went completely nuts with documenting where things go, even the students' things like writing tablets and math workbooks. If you have a system figured out that works for you I think it would be nice to come back to that same system already established in your classroom.
The documentation continued with my schedule. I know that schedules look nothing alike from year to year but this will give my sub something to go off of. This is probably one of the most time consuming parts of beginning a year and I want to make it as easy as I can for my sub.
Finally, I went around my entire classroom taking pictures of where furniture is located. Each August I come back to tables piled up in a corner, cabinets turned around against a wall, and chairs stacked to the ceiling. It is a crazy few days rearranging my classroom each year! I might spend hours tweaking the location of a freaking bookshelf because it affects the location of my computers 20 feet away. So this year, I got up close and personal with the location of everything in my room so that things can just be rolled, carted, and pushed back to where they should be. No more guessing and moving 10 times.
So that's how I have prepared my classroom for a long term sub starting at the beginning of the year. I've come to terms with this small amount of control over a situation where I seem to have none whatsoever.
I have been very busy with only 43 days left to the arrival of our little girl and summer vacation finally here. Nesting is kicking in full blast! Never in a million years would I have thought, however, that nesting would take the form that it has lately.
I found an amazing idea for a hot air balloon mobile on Etsy but baulked at the idea of spending $70 for something that could obviously be handmade. I did some research through Pinterest and found a DIY blog with the perfect template: www.howjoyfull.com. Joy did a wonderful job making her template and describing the overall process but I had to do a lot of research through YouTube videos to find exactly how to make this, that's why I'm posting it all here. I'm not going to lie to you and tell you that it was easy, or all that cheap, but it sure was fulfilling to make on my own!
These are the supplies that I bought at JoAnn's for a little under $50. I had to buy everything since I've never sewn before but I'm sure your total would be a lot less if you have any of these already on hand. Please disregard the smaller embroidery hoop, I didn't end up using it for this craft.
I downloaded the template from the HowJoyfull website, click on this template PDF to download directly.
I decided to use the size 2 and 3 outlines only. I figured out what color combinations I wanted to use and cut them out by placing the templates over the felt, using the rotary cutting set to cut.
Chevron patterns play a big part in the nursery so I decided to tackle the most complicated balloon first. I figured out how far away I wanted my cuts to be and used the angle lines on my cutting board to trace them out on my template.
Next, I placed the template paper over a felt piece and poked a hole through the point in the chevron pattern with a pen to make a small dot.
I used this dot as a place to mark where to stop cutting. Those lines on the cutting board were a life saver! The cutting was a tedious part but do not skip corners and cut more than one piece at a time, that will only result in wonky cuts that are uneven.
Once the cutting was complete, I lined them all up in order. Lookin' good already!
After researching how to sew two pieces of felt together, I decided to use a blanket stitch. I used this video to teach myself, I love that there's no annoying lady describing every detail. Watch and learn!
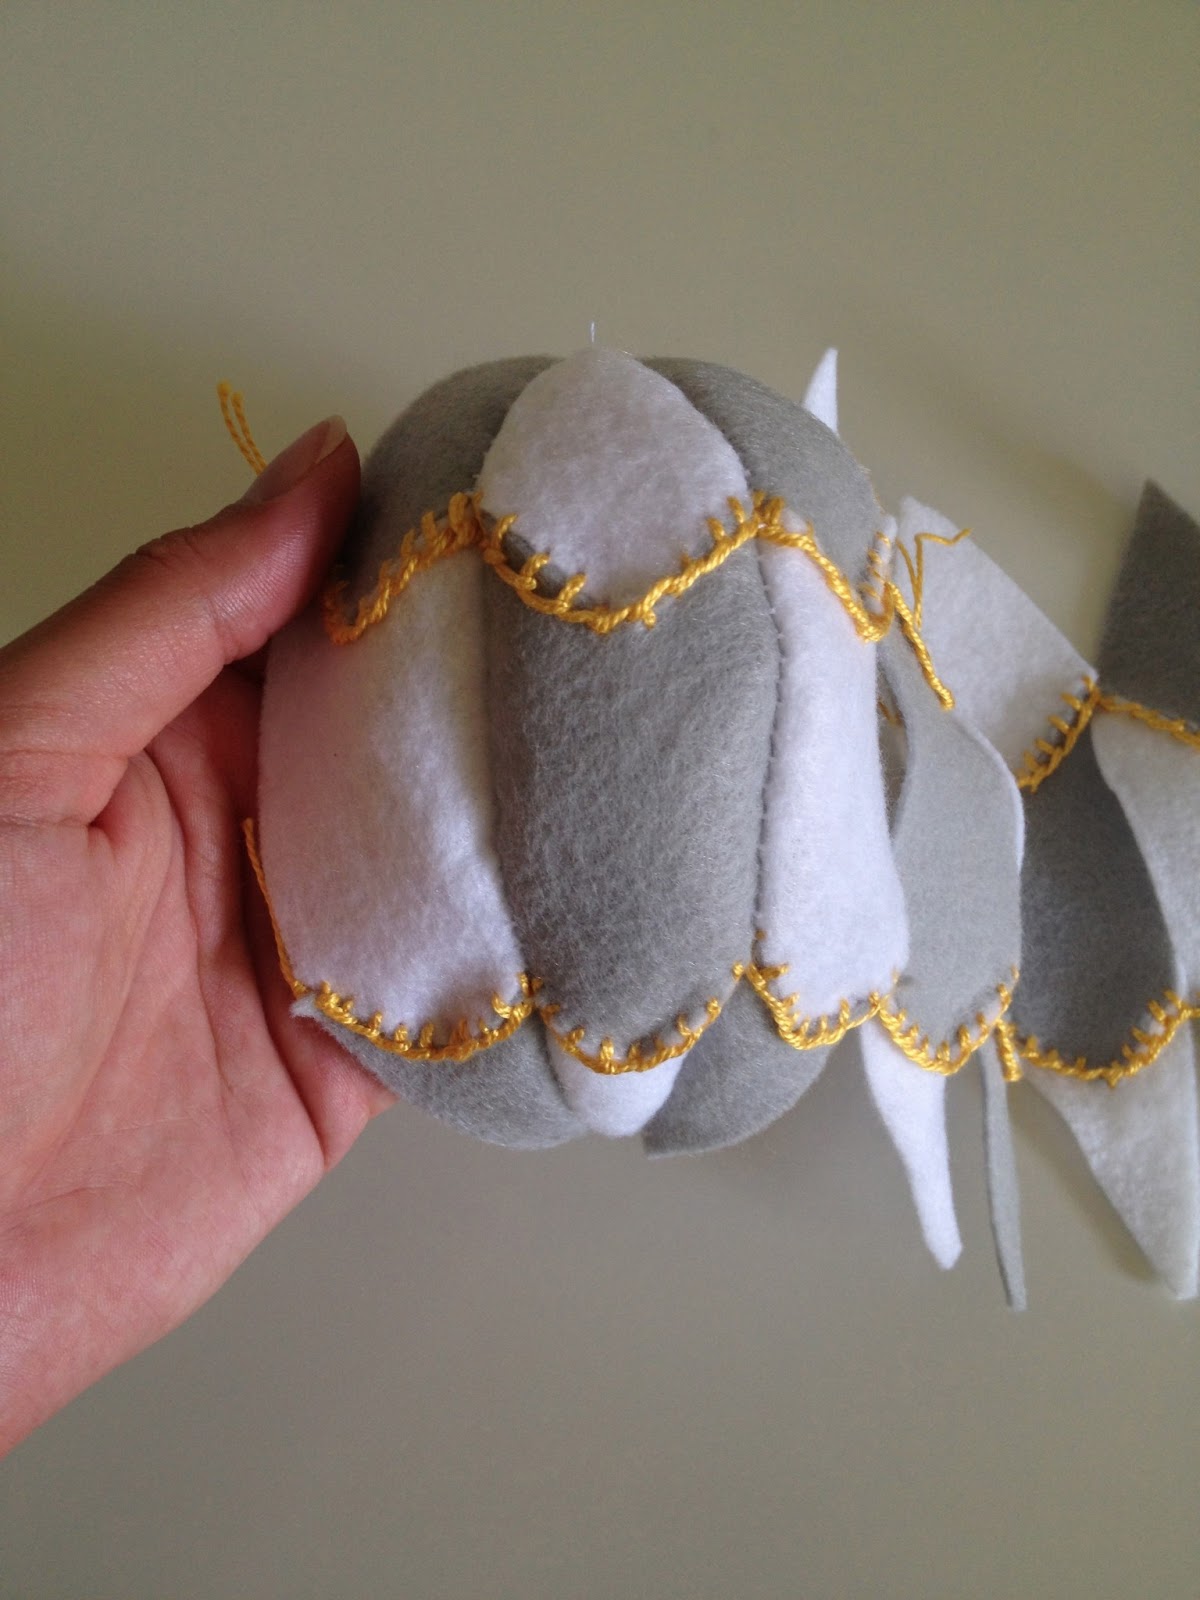
I did my blanket stitch on a flat surface to that the balloon will take shape properly. By the way, this is the side that will show on the balloon, I made sure no marks were visible.
Continue the same blanket stitch through all of the pieces, connecting them all together. The connecting stitches get tricky but just remember that if they are not that tight you can always fix it when you stitch them together vertically.
Tie off the top stitches and then start the same process all over again with the bottom pieces of the balloon. It's getting easier!
I forgot to take a picture of the next step but switch out your embroidery thread and needle for a general use needle and thread. I used plain white thread and a blanket stitch to connect the pieces vertically from top to bottom from the inside. Be sure to carefully attached the pieces at the tops, you will end up with a bunch of knots but it's important that they are secured.
Go ahead, take a look at what a cute balloon this will be. It's worth all of this effort!
I slipped a long piece of embroidery thread with a knot at the end through a small piece of felt and led the thread through the top of my balloon. This will be used to hang the balloons. You could also use fishing line if you'd rather the invisible floating look.
Then, I stitched up the last piece to about half way and flipped the balloon right side out. I used fluff from an old pillow to gently stuff the balloon to my liking and then stitched it closed.
I held the small circle, which I cut using the appropriate template, and used a blanket stitch to attach it to the bottom of my balloon.
To attach the 'basket', I tied a knot in a piece of embroidery floss and lead it through the bottom of the balloon, starting at the middle and coming out one side at 12 o'clock. LEAVE A TAIL ON THE THREAD! I didn't and it ended up being more difficult to tie at the end.
Cut one of the craft corks in half, this is the perfect size. I then pushed the needle through the cork and pulled it through with pliers.
I led the thread through at 6 o'clock on the bottom of the balloon and out again at 9 o'clock. I repeated the process through the cork again at a perpendicular angle. I finished back through the balloon at 3 o'clock, back out through the center and then tied the pieces together.
Voila, a finished balloon!
By the time I made a few balloons, I started getting really good at the flat blanket stitch. It's hard to describe but I started pulling this part tight by hand instead of straight from the needle....
.... then this thread. This prevented the thread from pulling the felt out of whack and resulted in a more even stitch.
I used a hot glue gun to attach this fun little pom pom ribbon.
I made clouds by freehand cutting and using gray embroidery floss to blanket stitch on the outside. It's still hanging from my ceiling fan as we are not set on the location of the crib but it is something I am really proud of. I will be sure to post pictures of the finished nursery soon!
I used the small embroidery hoop and leftover pieces of felt to make this little name plate. A running stitch attached the pennant and I used a backstitch to embroider our little girl's name. Love!
We are in the final stretch of school and have been draggin' butt with grades, tests, and long writing assignments. I decided that we need a little pick-me-up to get us through the final days of school.
Check out what the kids saw on Tuesday morning as they walked into our class...
Their eyes nearly popped out and nobody could close their mouth. It was hilarious to watch everyone round the corner and stop halfway in the door.
I have 22 balloons hanging from the ceiling for each child in my class. Each balloon has a small strip of paper with a quick but very fun activity for the kids to do that day. We count down the days by popping one balloon a day and doing the activity inside. The balloon is popped by the child whose name is written on the crepe paper streamer taped to the balloon. Some of the activities I have are "Play hot potato" or "Shaving cream creations". They all take less than 15 minutes but the kids get super excited each day to see what they get to do. It's a blast!
This week was also Teacher Appreciation week. My kids and parents were amazing! I feel so spoiled and very much appreciated. I don't think I could have dreamed up a better group of kids to have during this time in my life. They are so special and loving which is a good thing because this momma is starting to really look forward to relaxing by the pool all summer!
I received our little girl's baby book in the mail yesterday and I couldn't be happier with it. I searched high and low for the perfect book and finally turned to Etsy. Then, I found the store of Edna Mae and fell in love with her designs. She handmakes her covers and designs her pages on heavy card stock of the best quality. What I like about her books is that they are customizable and easy to arrange however I want because of the three-hole design. She has even more options on her webpage, www.ModernBabyBooks.com.
I decided on the gray cover and Whimsy Pink pages.
The colors are perfect for a little girl!
I love this page for marking down the milestones.
So many pages for writing down memories. What you can't see are the pale blue gridlines on each page, handy for staying straight and steady!
I placed this in the book already. I can hardly wait to fly back up to Michigan!
I am going to share a little more about how extremely spoiled I was by my room moms this year. These blankets were part of the diaper cake that I received. I was shocked and amazed to see that these are not just any blankets, they are hand stitched and embroidered blankets! I could hardly believe it when I started undoing that beautiful present; both Estevan and I were blown away by the love and dedication it took to make these.
Welcome to my blog. This is the spot where I store creative ideas, recipes, books, gardening schemes, and other sundry things that pass through my home. I hope that you like what you find and use some of my ideas to make your own cute little house!