Tuesday, November 24, 2009

Pumpkin Cookies with Brown Butter Icing

Have you had enough pumpkin for one season yet? Good, neither have I. Here's another recipe that I found using a Martha recipe via Katy Elliot's Blog.


For the Cookies
2 3/4 cups all-purpose flour
1 teaspoon baking powder
1 teaspoon baking soda
1 1/4 teaspoons coarse salt
1 1/2 teaspoons ground cinnamon
1 1/4 teaspoons ground ginger
3/4 teaspoon ground nutmeg
3/4 cup (1 1/2 sticks) unsalted butter, softened
2 1/4 cups packed light-brown sugar
2 large eggs
1 1/2 cups canned solid-pack pumpkin (14 ounces)
3/4 cup evaporated milk
1 teaspoon pure vanilla extract

For the Icing

4 cups confectioners' sugar, sifted
10 tablespoons (1 1/4 sticks) unsalted butter
1/4 cup plus 1 tablespoon evaporated milk
2 teaspoons pure vanilla extract


Make cookies: Preheat the oven to 375 degrees. Whisk together flour, baking powder, baking soda, salt, cinnamon, ginger, and nutmeg in a medium bowl; set aside.

Put butter and brown sugar in the bowl of an electric mixer fitted with the paddle attachment.
Mix on medium speed until pale and fluffy, about 3 minutes. Mix in eggs. Reduce speed to low. Add pumpkin, evaporated milk, and vanilla; mix until well blended, about 2 minutes. Add flour mixture; mix until combined.


Martha says to use a pastry bag to pipe onto parchment lined pans but I just spooned 1 1/2-inch rounds onto seasoned stone baking sheets, spacing 1 inch apart. Bake cookies about 12 minutes. Cool on sheets on wire racks 5 minutes. Transfer cookies to wire racks; let cool completely.


Make icing: Put confectioners' sugar in a large bowl; set aside. Melt butter in a small saucepan over medium heat. Cook, swirling pan occasionally, until golden brown, about 3 minutes. Immediately add butter to confectioners' sugar, scraping any browned bits from sides and bottom of pan. Add evaporated milk and vanilla; stir until smooth. Spread about 1 teaspoon icing onto each cookie. If icing stiffens, stir in more evaporated milk, a little at a time. Cookies can be stored in single layers in airtight containers at room temperature up to 3 days. Pin It Now!

Piecrust Cutters

These have to be the cutest little tools I have ever seen! SO SO SO adorable. I don't just want them, I need them!


Seriously, buy them for me at William Sonoma.


Pin It Now!

Monday, November 23, 2009

Classic Cardy

Ok, I normally would be saying "Ugg for UGLY!" but I am falling in love with these boots! I simply adore the sweater and button details. Plus, now that I don't have to worry about salt and slush ruining these little beauties, I love them even more. Go to Zappos to check them out, free shipping is the best!

Pin It Now!
Saturday, November 21, 2009

Ornament Exchange

I'm very pleased to say that my ornament for the 2009 Bloggers Ornament Exchange is done and packaged! Just waiting till Monday morning to mail it out to my swap partner, April. I'm so excited to see what's in store for me.

Check out April's sweet little blog.


No peeking!
Pin It Now!

Thursday, November 19, 2009

Pilgrim Pumpkin Pie

I made my very first pumpkin pie last night. It actually turned out very good. I should have never doubted The Good Housekeeping Cookbook. Here's the recipe:

Ingredients

1 pie crust
1 can (15 oz) pumpkin
1 can (12 oz) evaporated milk
3/4 cup packed brown sugar
2 large eggs
1 teaspoon ground cinnamon
1/2 teaspoon ground ginger
1/2 teaspoon salt
1/4 teaspoon ground nutmeg
1/4 teaspoon ground cloves (my own little addition to the recipe)

  • Prepare pie crust in dish as directed.
  • Preheat oven to 375 degrees F.
  • In large bowl, with wire whisk, mix all ingredients until well combined.
  • Carefully pour pumpkin filling into pie crust.
  • Bake until knife inserted 1 inch from edge comes out clean, about 50 minutes.
  • Cook on wire rack at least 1 hour before cutting.
  • Serve with whipped cream.


Here, try a bite!
Pin It Now!

Tuesday, November 17, 2009

Away in a manger

I think I may have a compulsive disorder. I simply HAD to finish these today!


Closer picture of the Three Wise Men.


Yeah, their crowns aren't even dry yet. I just had to take a picture to show you!
Pin It Now!

Done!

In all honesty, I thought this advent calendar was going to take much longer to complete. But since it only took a few days to complete I suppose I will just have to hang it up on my mantel (quiet little squeals of joy). I'm now patiently (not really) waiting for Joseph and Mary to start their journey on December 1st.

Here's what I used:
  • Wooden gift tags (sets of 4 found at Michael's)
  • Thin Popsicle sticks
  • Wooden disks
  • Wooden star (glitter optional)
  • Stiff felt (found in kid's craft aisle)
  • Wood glue
  • Black spray paint (matte finish)
  • Oil pastels (could also use paint, I just had these on hand)
  • Self-adhesive magnet strips
  • White puffy paint
  • Twine
Here's how I made it:

I lined up the wooden gift tags with their holes at the top (the wooden disks will hide them) and then glued Popsicle sticks on the back to hold them all together. I glued about 4 sticks on the back of each row (see inset picture). I let it dry completely before flipping the rows over and gluing the wooden disks over each tag hole. Then I spray painted it all black. I then penciled all the numbers in because I know I make mistakes. After making sure my numbers were correct I went over the pencil with white puffy paint. Next, I drew in windows and doors with the oil pastels and stuck on pieces of the magnets for each house. Then, on the top row of houses, I glued on a piece of twine with 2 loops; these loops are used to hang it. I then glued all the houses onto a piece of felt, making sure that the 2 twine loops were peeking out the top. I attached a Popsicle stick manger to the top row using 2 more Popsicle stick braces which I wrapped twine around to appear more rustic. Finally, another piece of twine was tied between the two loops so that I can hang it on my mantel.


To make Joseph, Mary, and Donkey:

This was tricky because of how small they are. I used two layers of felt for each figure, this makes them more sturdy. The bottom layer of felt for each figure was light tan. I simply cut out a hole for their faces which let the light tan show through. I used webbing to stick them together (something I had left over from my wreath craft).


Here's a closeup of the village. I drew cozy little windows and doors using oil pastels.


Mary and Joseph makin' their way up!


I can't wait till they are sitting up there in the manger. I'm probably going to make a different set for this scene, though... I'm thinking a whole manger scene including baby Jesus and the three wise men. Going to need more magnets! Pin It Now!

Fish-in-a-bag Soap

I love this! From Little Birdie Secrets, found via One Pretty Thing.
Pin It Now!

Monday, November 16, 2009

Guess what I'm making

Here are some clues.... (Thank you Jaime at Chirpings of Little Bird for the inspiration!)


I'm very giddy about this project. I'll fill you in once it's complete! Pin It Now!

Wednesday, November 11, 2009

Melt in your mouth Pumpkin Bread

Get ready for a mouth watering, eyes rolling to the back of you head, involuntary "mmmm" experience. Yeah, it's that good.


Ingredients
3 cups sugar (hey, I never said it was good for you)
1 cup vegetable oil
4 eggs
3 1/2 cup flour
1/2 teaspoon baking powder
2 teaspoon baking soda
1 1/2 teaspoon salt
1-1 1/2 teaspoon each ginger, cinnamon, nutmeg, ground cloves (I used less ginger and nutmeg)
2/3 cup water
2 cup canned pumpkin
1 cup finely chopped walnuts


Directions
  1. Preheat oven to 350 degrees F.
  2. Mix together sugar, oil, and eggs; beat until well mixed.
  3. Sift together the flour, baking powder, baking soda, salt, and spices. Add to the egg mixture alternately with water.
  4. Stir in pumpkin and walnuts.
  5. Pour into greased bread pans.
  6. Bake about 1 hour for 9X5 pans and about 45 minutes for smaller pans (pictured).
Pin It Now!

Tuesday, November 10, 2009

I'm Flip Flops, what shoe are you?


You Are Flip Flops


You are laid back and very friendly.

Cheery and sunny in disposition, you usually have something to smile about.


Style is important to you, as long as you can stay casual.

It takes a lot to get you to dress up!


You are a loyal and true person, though you can be a bit of a flake.

You tend to "play hooky" and blow off responsibilities a lot more than most people.


You should live: By the beach


You should work: At a casual up and coming company

Pin It Now!

Sunday, November 8, 2009

Ornament Exchange

This is why I love holidays!

Go
HERE to sign up, you know you want to.

Cut off date for sign up is November 12 and they need to be made and shipped by November 23.


Pin It Now!

Wednesday, November 4, 2009

Falling for felt

Fall is technically taking place, I know that, but it sure doesn't feel like it here. After living most of my childhood in upstate New York, nestled in the sloping Appalachian mountains, I've become very accustomed to judging my time periods by the ever changing color of the trees. With the temperature edging around 80 all week in Texas, I have a feeling that I'm going to have to make my own change. Maybe I'll hang some of these lovely felt creations around the house.


Lovely felt leaf garland from Pam Garrison found via You Are My Fave.


Fall Berry Wreath from Martha.


A wreath that I made last Christmas using Martha's idea from above.


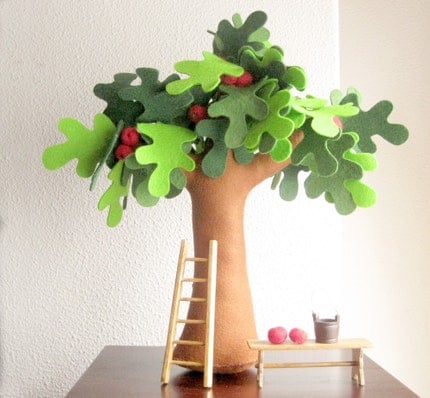
Felt Apple Tree found on Esty.
For some reason, I love this idea and might make one for my desk when I get my own classroom.
Although I would make one change... I would definitely put apple leaves on the tree instead of oak.
Pin It Now!
Blog Widget by LinkWithin